Pumpkin bread.

< Falling into Fall >

Pumpkin bread is the first thing in mind when I think of fall baking. It is simple and easy to make and absolutely delicious.

I don’t always stick to a particular recipe for pumpkin bread and most of the recipes i’ve tired calls for the same ingredients and taste quite similar. This particular recipe I found looks amazing and moist so I decided to try it out!

I’m using Libby’s pure pumpkin purée which most people are familiar with. It was always available in my local supermarket throughout the year but when I needed it, there was no sign of it at all (maybe everyone are gonna making pumpkin pie!) . I had to carry three cans of pumpkin purée home all the way from town. (town supermarket usually carries more imported goods)

Pumpkin pie spice is not common in my country so I had to get it off iHerb.com.

  Mix all the wet ingredients together with sugar till it’s well combined.

Whisk dry ingredients together or use a sift if your flour has clumps like mine.

Off they go into the oven!

INGREDIENTS

recipe adapted from mybakingaddiction.com

1 (15 ounce/425g) can pumpkin puree

4 eggs

1 cup vegetable oil

2/3 cup water (I used milk but you can also use buttermilk)

2 teaspoons pure vanilla extract

2 1/2 cups sugar

3 1/2 cups all-purpose flour

2 teaspoons baking soda

1 1/2 teaspoons kosher salt

2 tablespoons pumpkin pie spice


Preheat oven to 350°F/162°C. Grease loaf pans. In the bowl, combine pumpkin, eggs, oil, water, vanilla and sugar until well blended. In a large bowl, whisk together the flour, baking soda, salt, and pumpkin pie spice until well combined. Stir the dry ingredients into the pumpkin mixture until just blended. Pour batter into the prepared pans. Bake in preheated oven for 60-70 minutes or until a toothpick inserted in the center comes out clean.

*Optional. Add nuts or chocolate chip

Last minute dessert bar ideas + 2 mousse recipe.

2

I haven’t been able to blog for the past two months was because I was away on a holiday to Japan and also, my sister gave birth to a cute baby boy (I am a aunt to twothree adorable nephews). I was busy being the personal assistant to my sister and also taking care of my other nephews!

I have been planning for the dessert bar for a couple of months. It didn’t looked too pintrest worthy though. With all the traveling and stuff, I didn’t have enough time to look for DIY and stuff for decorations. But nevertheless, people enjoyed the dessert bar for my baby nephew’s baby shower.

I prepared all the edible goodies the day before the baby shower. I cheated a little and made premix brownies and rainbow with white cake mix.

THINGS ON THE TABLE.

Nutella mousse w/ OREO crumbs and topped w/ crushed hazelnut.

Fugdy brownie

Rainbow cake with cream cheese frosting.

Lemon cheesecake mousse w/ digestive crumbs topped w/ lemon zest

Kit-kat balls

M&m’s

Mini mashmallows

Small dessert spoons

Paper bags for candies

INGREDIENTS

recipe adapted from Cooking Classy

12 Oreos, including stuffing, finely crushed

2 Tbsp butter, melted

1 1/3 cups heavy cream

4 Tbsp granulated sugar, divided

1 Tbsp unsweetened cocoa powder

8 oz cream cheese, softened

1/2 cup + 2 Tbsp Nutella

1/2 tsp vanilla extract

2/3 cup heavy cream

1 1/2 Tbsp granulated sugar

Toasted, chopped hazelnuts (optional)

Chocolate shavings or sprinkles (optional)

DIRECTIONS

For the crust:

In a bowl, using a fork, blend together crushed Oreo’s and melted butter until evenly coated (alternately, I just chopped the Oreos into fine crumbs in the food processor then poured the butter and and blended, scraping down sides of processor once). Divide crust mixture among 5 – 6 glass cups or dessert cups. Gently press into an even layer. Set aside in refrigerator while preparing mousse.

For the mousse:

In a mixing bowl, using an electric hand mixer, whip 1 1/3 cups heavy cream until soft peaks form. Add in 3 Tbsp granulated sugar and 1 Tbsp cocoa powder and whip until stiff peaks form. In a separate mixing bowl, using electric hand mixer, whip cream cheese and 1 Tbsp sugar until very smooth and fluffy. Add in Nutella and vanilla and whip until well blended and fluffy. Fold half of the whipped cream mixture into cream cheese mixture and fold until slightly combined, then add remaining half and fold just until no streaks remain. Transfer mixture to a large piping bag (you can also just spoon it into cups or use freezer Ziploc bags and cut corner, if you don’t have piping bags). Remove cups from refrigerator and pipe mousse over crust in each cup, then transfer to refrigerator and chill 1 hour (or up to 12 hours).

For the topping:

In a mixing bowl, using an electric hand mixer, whip 2/3 cup heavy cream until soft peaks form. Add in 1 1/2 Tbsp granulated sugar and whip until stiff peaks form. Transfer to a piping bag and pipe over tops of mousse. Serve garnished with chopped hazelnuts and chocolate shavings if desired.

INGREDIENTS
recipe adapted from Overtimecook

1 cup heavy whipping cream or non-dairy whip topping

1 cup lemon pie filling

12 ounces unwhipped cream cheese (or tofutti cream cheese)

1 teaspoon vanilla extract

a few drops yellow food coloring, optional

1 cup powdered sugar

½ cup graham cracker crumbs

2 Tablespoons sugar

2 Tablespoons melted butter or margarine

DIRECTIONS
In the bowl of an electric mixer, whip the cream until stiff.
Remove from the mixer and set aside. (No need to wash the bowl before continuing.) Add the lemon pie filling and cream cheese to the mixer and beat until smooth. Add the vanilla extract, food coloring (if using) and powdered sugar and beat until combined.
Using a rubber spatula, add the whipped cream into the cream cheese mixture, slowly (do it in batches), until its fully incorporated. Set aside.
To make the crumbs, combine the graham cracker crumbs, sugar and melted butter or margarine.
Place a small amount of the crumbs on the bottom of a cup. Pipe the mousse over the crumbs to fill the cup, then add more crumbs on top. Serve chilled.


Chinese Almond Jelly.

One of my favourite dessert of all time has got to be almond jelly. Specifically my mum’s almond jelly. My sisters and I like our almond jelly stronger in flavour than commercially made ones. Almond jelly with canned fruits is the perfect ending to any meal, it is light and refreshing.

It is super quick and easy to make. Serve it after a heavy meal and your guest will sure to like it.

INGREDIENTS

2 packages (2oz) of agar-agar powder, clear kind.

1 can (14oz/400g) of full fat evaporated milk

4 cups of water

1tsp-2tsp almond extract

1/4-1/2 cup sugar

TOPPINGS

ice cubes

canned fruits of your choice

water
Prepare moulds or bowl and place it in a water bath so that your jelly mixture can cool down quicker.

Bring 4 cups of water to a simmer under medium low heat and slowly sprinkle the agar-agar powder in while stirring.

After all the agar-agar powder have dissolved, pour in the evaporated milk and stir, then add the amount of sugar to your liking (note that the canned fruits your will be serving it with will add more sweetness to your overall dessert, so avoid adding too much sugar into your jelly mixture.)

When everything has dissolved, turn off the heat and add in your almond extract. Don’t add all the extract at once as it may be too overpowering for some people, so add it to your liking. Remember, you can add but you can’t take it out.

Pour your jelly mixture into moulds and if there’s any air bubble, remove it with a spoon or ‘poke’ it with a toothpick. The mixture will set quite quickly under room temperature. Once the jelly has cooled and set, refrigerate for at least 3 hours to chill before serving.

Serve almond jelly cut up into small chunks with canned fruits, ice cubes and water to slightly dilute the fruit syrup.

Banana Cake using RICE COOKER.

< Nanana Bananana >

You know you’re Asian when you have rice cooker at home. There are many types of rice cooker out there and many of which does not only cooks rice but also bake cakes & cook congee.

I had a bunch of mini banana left over which are super over ripe to a stage that they are almost moulding! Banana are the sweetest when they are ‘black’ (not rotten).

Tired of the usual Banana Bread or the Banana Nutella bread (which I clearly thought I have blogged about!!) so I went online & google for “rice cooker banana cake”. Decided to try out one recipe with fewer ingredients. The ingredients & method are exactly the same as the recipe I use for the regular baked banana bread. 

INGREDIENTS 

recipe adapted from Everybody Eats Well in Flanders

3 eggs

110g sugar

110g butter, melted (I like to use oil in my banana bread/cake)

200g ripe bananas

160g all purpose flour

3/4 tsp baking powder

3/4 tsp baking soda

a pinch of salt

Sift flour, baking powder & baking soda in a medium bowl. Peel & mash bananas. Combine sugar & butter/oil till fully combined. To the sugar mixture, add eggs & salt, mix well and add in the bananas. Sift in flour mixture in three batch & slowly fold to combine. Pour mixture into rice cooker bowl and press the ‘cake’ function & if your rice cooker doesn’t have one, then press ‘cook’ function & let it cook. Once one cycle is done, repeat two more times or until your cake is done.

Cheesy Pineapple Tart.

IMG_3225

Everyone is familiar with pineapple tarts and in recent years many have came out with cheese pineapple tart.

This is my take on the new tradition, Cheese Pineapple tart.

There are many recipes online for cheese pineapple tart and they all would only ask for Parmesan powder( the dried kind ). Instead of using Parmesan powder, I’m using finely grated Parmesan cheese ( the one you pick up from the dairy section ) in my dough crust & sprinkled with a mixture of finely shredded Emmental cheese, grated parmigiano reggiano & cayenne pepper.

IMG_3223

INGREDIENTS

adapted from Nasi Lemak Lover

250g butter

100g sweetened condensed milk

470g all purpose flour

2 egg yolk

50g finely grated parmesan cheese( I went crazy & used 100g)

1 egg +1 egg yolk for egg walk

60g finely shredded emmental cheese + 2 heaping tablespoon grated parmigiano reggiano + 2 tsp cayenne pepper

500-600g Pineapple filling (homemade or store-bought)

Cream butter and condensed milk till light. Add in egg yolk, and beat until combine. Mix in flour and cheese powder, mix till become a soft and not sticky dough. Roll pineapple filling into desire shape. Flatten a piece of dough and place a piece of the roll pineapple filling in the middle. Bring the edges of the dough together and press lightly to seal. Place dough inside the mould, flatten dough to conform to shape of mould. Remove pineapple tarts from the mould. Apply egg wash on the pineapple tarts & sprinkle on shredded cheese mixture. Bake in preheated oven at 170°C for 20-25mins or until golden brown. Cool completely before storing.

IMG_3224

Lemon Cheesecake.

< Say cheese! >

IMG_2380

Every year my aunt would request cheesecake for her birthday and every year I would try different recipe or different kind of cheesecake. I’ve tried making Japanese style chiffon cheesecake, New York cheese cake, Cheesecake tart and many more but this year, I made a simple lemon cheesecake. Being a cheesecake lover, I bought  many recipe books on cheesecake and my favourite one has to be the Best-Loved by Kraft Philadelphia!! It includes so many recipes from appetisers, dips to dessert!

I used the Philadelphia 3-Step luscious lemon cheesecake recipe. The recipe was so easy to follow and the ingredients needed apart from cream cheese are ingredients readily available at the reach of your hands.

INGREDIENTS

adapted from Best- Loved Kraft Philadelphia Recipes (cookbook)

2 pkg. (8 oz. each) Cream cheese, room temperatured

1/2 cup sugar

1/2 tsp lemon zest

1 tbsp lemon juice

1/2 tsp vanilla extract

2 eggs

1 graham cracker pie crust (6 oz.)

*( I used 220g digestive biscuits & 110g unsalted butter, melted)

IMG_2381Preheat oven to 350°F/176°C. If you are not using pre-made pie crust like me, prepare the crust by crushing your biscuits using a food processor or by putting it in a zip-lock bag and crushing it with an heavy object.

IMG_2385Transfer your biscuit crumbs into a medium sized bowl and add the melted butter and mix till mixture resembles wet sand.

IMG_2386Pour your crust mixture into your springform pan and press it down with a flat object (I used a mason jar lid). Bake in oven for 8-10 minutes or until your crust is slightly browned and fragrant!

IMG_2388In the meantime while your crust is baking, add all your ingredients for the filling except for the eggs and vanilla into a mixing bowl.

IMG_2389

Beat with an electric mixer on medium speed until it is well combined and add in your vanilla and eggs and beat until filling is smooth.

IMG_2390Transfer mixture into the springform pan over the crust. Bake in oven for 40-45 minutes or until mixture is set. The middle of your cheesecake should still be slightly jiggle and if your insert a toothpick into the center, it should stay upright. Cool and refrigerate for at least 4 hours and serve.

IMG_2403

Mince Pie.

< HO.HO.HO >

mincepies

My absolute favourite thing about Christmas is not just about the festive vibe or the decoration but also mince pies! During mid-November or early December my favourite stores will bring out their amazing Christmas range & of course mince piessss ❤

At first, I thought of mince pie as a savoury dish filled with some sort of minced meat, (I’m sure a lot of people had the same thinking as me :P) I saw some in M&S one day and out of curiously I bought my first ever box of mince pie & boyy.. WHERE HAVE YOU BEEN ALL THIS TIME?! It was definitely a very decadent dessert as it is very buttery and sweet. But hey! It’s CHRISTMAS!

Every year, I will buy dozen of boxes of mince pies and it will cost me a fortune. So this year, I’ve decided to save a few bucks on boxes of mince pie and make some (semi) homemade ones. Bought a few jars of mincemeat so I could have them all year round 😀 A jar of mincemeat cost around 6 bucks which is half the price of 6 pieces of mince pie. If you’re generous with your filling, a jar would yield around 15 small mince pies.

1

There were a lot of mincemeat to choose from, but I ultimately went with the Robertson Classic Mincemeat! The filling was more tart compared to those that I’ll always get from M&S but nevertheless, It was very well spiced and delicious!

I made a batch of short crust pasty and pressed it into some disposable aluminium tart cases (pictured behind the jar). It was a easy to work with dough as I have chill it overnight and brought it to room temperature 15 minutes before working with it.

2

It came out really good. Nothing went wrong in the process of making these babies. But I think it would look better with crimped edge or (pressed with a fork method) I also sprinkled some sugar & cinnamon mixture after applying egg wash on top! I had some left over dough but I used up a jar of mincemeat (411g)!

INGREDIENTS

adapted by Orlando Murrin for BBC goodfood

225g cold butter, diced

350g plain flour

100g golden caster sugar (I used icing sugar)

Pinch of salt

280g mincemeat

1 small egg

sugar, to sprinkle on top

For the pastry, rub cold, diced butter into plain flour, then mix in caster sugar and a pinch of salt. Rub butter into flour until it resembles corse breadcrumbs. Press dough together to form a ball. The dough will be fairly firm, like shortbread dough. You can use the dough immediately, or chill for later.

Preheat the oven to 200°C/ 392°F. Press a small walnut-sized balls of pastry into each tart cases or muffin tray. Spoon mincemeat into the pies.

Roll out the rest of the dough a cut small stars using a star cookie cutter and place a star on each pie.

Beat 1 small egg and brush the tops of the pies. Sprinkle with sugar & cinnamon mixture. Bake for 15-20 minutes (depending on the size) until golden. Cool completely before serving. They will keep for 3 to 4 days in an airtight container.

The short crust pastry was indeed very short! Very buttery and crumbly. A must revisit recipe for me! These jars of mincemeat are really good cheats if you do not want to buy bags of dried peels and dried fruits and only using a small amount. Although the filling was a little too tart for my liking but it was still very good with the pastry.

DAYS TO CHRISTMAS : 6 DAYS

*ps. too many <mince pie> in this post.

Pecan pie.

pecanpie

I used to dislike pecans but after having my first slice of pecan pie 2 years back, I fell in love with it! My first pecan pie was sweet, gooey and the nuts was crunchy and soft at the same time. Ever since then, I’ve been meaning to make pecan pie.

At the start of November I went pecan hunting, from my neighbourhood supermarket to baking specialty store, there were no sight of my pecan. Oh boy.. I was about to give up until when I was grocery shopping at my neighbourhood supermarket around end of November, I saw bags of pecans at the baking sections. YIPEE! I quickly grabbed a bag. I was about to walk away but then, I saw the price tag of the pecans…. It was around $8 for a bag of nuts (around 1 cups of pecans). IT WAS NUTSS! Stood there thinking if I should put it back or into the shopping trolley.. In the end I obviously got it!

Searched on YouTube for Pecan pie recipe and stumbled upon Foodwishes’s recipe and I obviously went with Chef John’s recipe 😀 Recipe called for bourbon & I can finally crack open my cheap bourbon I got from Duty free from my London trip!

IMG_2255

INGREDIENTS for 1 pie

adapted from foodwishes.com

Pie crust

2 cups pecan halves, roasted

1/2 cup butter (4 oz/113g)

1 cup light brown sugar

1/2 cup white sugar

1/2 cup light corn syrup

1/2 tsp fine salt

1 tsp vanilla

1 tbsp bourbon

2 tbsp milk

3 tbsp flour

3 large eggs

Pre bake pie crust. In a medium saucepan, melt butter,brown sugar, white sugar, corn syrup, salt, vanilla, bourbon, milk, flour. Mix over medium heat until everything has fully melted and bring mixture to a boil and set aside.

IMG_2172

Whisk eggs and slowly pour in cooled sugar mixture, mix till combined. Add pecans onto pie crust and pour over filling. Bake at 350°F/ 176°C. for about 45 minutes, or until filling is browned and set.

IMG_2174

*I halved the recipe and made two 12 x 2.5 cm tin pies and some leftover filling in a ramekins. 

Thanksgiving 2014 + RECIPES.

 < 2014 >

  thanksgiving14

It’s our third year celebrating Thanksgiving at the household. As usual, I’ve prepared a simple dinner on Thanksgiving day!

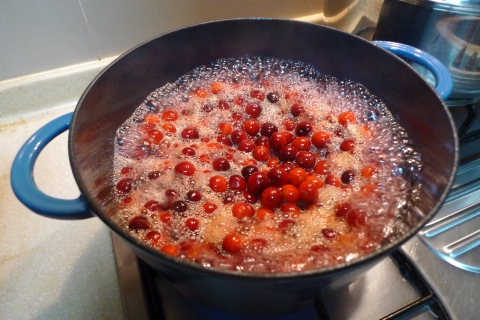
A day before Thanksgiving, I went ahead and made the cranberry sauce for tomorrow’s dinner! It was the same cranberry sauce that I’ve made before but add some more spices and flavours into it.

P1090544

Ingredients!

I bought a bag of fresh cranberries a few weeks back and froze it until needed! All it needs are a few simple ingredients you would probably have lying around the kitchen! Just add all your ingredients into a pot and cook on medium heat until cranberries have popped. Lower heat to low and simmer until mixture has thicken to your desire consistency. I simmered mine for around 30 minutes on very low heat till jam like consistency but take note that the cranberry sauce will thicken more as it cools.

P1090547

P1090550

INGREDIENTS

1 bag of frozen or fresh cranberries (around 4 cups)

1 cup pear, diced in the same size as the cranberries

1 orange, juiced and peel the rind into strips

1 cinnamon stick

1 1/2 cup sugar (depends on the tartness of your berries)

1 cup water

P1090557

Store in airtight container & refrigerate until needed.

All the side dishes I made were recipe from Chef John of Foodwishes! Love all his recipes and decided to make a few of his recipe for Thanksgiving!

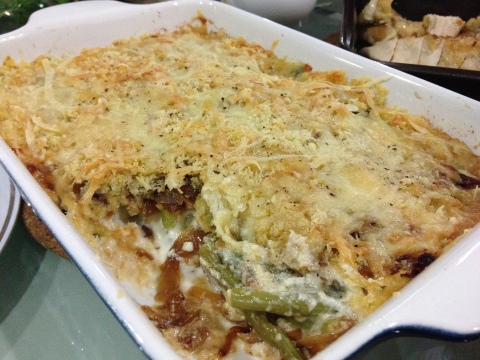
The first of three was a French onion green bean casserole. It was an excellent recipe, so creamy and delicious! Love the crispy topping/ melted crispy cheese & the caramelised onions compliments the creamy roux so much! (insert drooling face) I would definitely make this recipe again! <3<3

IMG_2195

INGREDIENTS
adapted from foodwishes.com
For the onions:
2 tbsp butter
2 or 3 yellow onions, sliced
salt and pepper to taste
1 tbsp sherry vinegar (stirred into the onions after they are caramelized)
For the white sauce:
2 tbsp butter
2 1/2 tbsp flour
2 1/2 cups milk
pinch of nutmeg
cayenne to taste
1/4 tsp dried thyme
salt and pepper to taste
For the topping:
2/3 cup panko or other style bread crumbs
2 tbsp melted butter
For the rest:
2 lbs (1kg) green beans, trimmed, blanched
salt and pepper to taste
4 oz grated Gruyere cheese, divided
1/3 cup grated Parmesan cheese

In a medium pot, melt the butter over high heat and add in your sliced onions. Fry until slightly translucent, season with salt and pepper. Continue to cook until onions turns brown, lower heat to medium low. Cook onions softens and caramelised.

For the roux sauce, melt butter over medium high heat and add in flour and whisk till fully combined. Cook flour mixture for 2-3 minutes to cook out the raw flavour of the flour. Slowly whisk in cold milk into flour mixtures and cook until mixture thickens. Season with cayenne, salt, pepper, nutmeg & dried thyme. Set aside until needed.

Trim your green beans and blanch it for 1-2 minutes, drain and set aside.

Mix breadcrumbs with melted butter, set aside.

Now layer your casserole in this order: half of your caramelised onions, all of your green beans, all of the white sauce, top with the rest of the caramelised onions, sprinkle half of gruyere cheese, breadcrumb mixture, rest of gruyere and parmesan cheese. Bake in 375°F / 190°C oven for 30 minutes of until the top is golden brown and bubbly!

IMG_2200

Next! Family’s favourite recipe for mash potatoes. It’s no ordinary mash, it’s Mascarpone mash. The mascarpone definitely adds a different element to the creamy mash. The slightly crispy top = LOVE!!

IMG_2197

INGREDIENTS

adapted from foodwishes.com

4 1/4 (2 kg) pounds russet potatoes
salt and pepper to taste
cayenne to taste
1 cup butter (2 sticks/ 227g)
1/2 cup mascarpone cheese
3/4 cup milk
1 egg yolk

Peel and half potatoes lengthwise and boil until completely cooked, cooking time depends of the thickness of the potatoes. Drain cooked potatoes and mash with butter & season with salt, pepper and cayenne. In another bowl, whisk mascarpone (make sure it is softened), milk and egg yolk until fully incorporated and frothy. Slowly mix your cheese mixture into mashed potatoes and transfer mixture into a baking dish and bake in an 425°F/ 218°C oven for 20 minutes or until the top is golden and crispy.

I cheated again with my stuffing/ dressing, I bought a bag of Pepperidge Farm’s cornbread stuffing mix 😀 Instead of adding just celery and onions, I added minced/grounded pork into the mixture! Family really liked this though! (THUMBS UP)

IMG_2196

INGREDIENTS

Half a bag of cornbread stuffing mix (around 4 cups)

4 cups chicken broth

300grams minced pork

2 stalk celery, diced

1 medium onion, diced

1 tsp cayenne pepper

1tsp dried thyme

salt & pepper to taste

Firstly sauté celery and onions until soften. Add in minced pork and season with cayenne, thyme, salt and pepper. Brown meat and add mixture along with juices into cornbread stuffing mix. Pour in chicken broth and mix evenly. Transfer mixture into dish and press down so that the cornbread can soak up all the broth. Bake at 375°F / 190°C oven for 30 minutes or until it is crispy on top!

Yeah great job. Completely forgotten to take a picture of the roasted chicken. It was just a simple roasted chicken that I spatchcock it, season with salt, pepper, olive oil, garlic, rosemary and then roasted in the oven at 425°F/ 218°C oven for around 35 minutes.

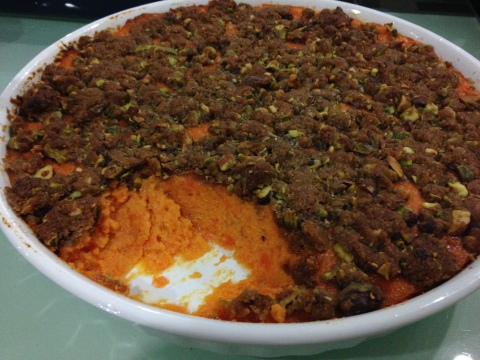
Dessert was a simple sweet potato casserole with crispy & crunchy pistachio topping. Wasn’t really a big hit. The sweet potatoes I got was not sweet & kind of lacking in (sweet potato) flavour..?? But.., the topping was sooo good! I could have just scooped all the topping and ate it, but I didn’t 😦

IMG_2204

INGREDIENTS

adapted from foodwishes.com

2 1/2 lbs (1.1kg) sweet potatoes

salt to taste
2 tbsp butter
2 large eggs
1/4 cup maple syrup
1/4 cup buttermilk
1/3 cup milk
1/2 tsp vanilla
1/2 tsp salt
pinch of allspice
pinch of cayenne
Pistachio crust:
1/2 cup chopped pistachios
1/2 cup light brown sugar
1/3 cup all-purpose flour
4 tbsp melted butter
It was definitely a great dinner (insert proud face) and there were a few recipe that I would prepare again!
IMG_2203

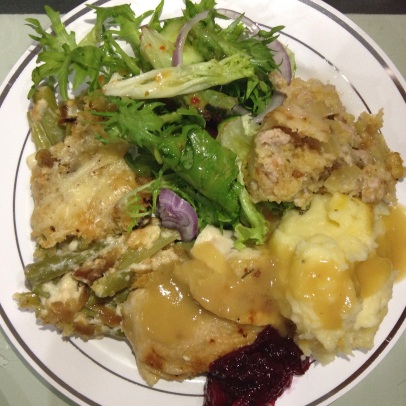
Clockwise: Salad, stuffing/dressing, mash, homemade gravy, cranberry sauce, roast chicken, green bean casserole.

Things I’m thankful for:

People who have followed and liked my lame blog.

My family for supporting my choice of gap year & culinary school.

Being alive.

Thai iced milk tea cupcakes.

thaimilktea

I have an obsession with Thai milk tea. And when I saw a recipe online for Thai milk tea cupcake, I went crazy! ‘ I have to make this tomorrow’ was the first thing in my mine when I saw it. Luckily I have almost all the ingredients readily available at home except for condensed milk. The first thing in the morning after having my breakfast I quickly ran down to my neighbourhood mini-mart to get some eggs and condensed milk! Phew! Now I have all the ingredients to make these little creatures!

IMG_2004

Thai iced milk tea cupcake

The recipe was relatively easy to follow and simple to make!

First step is to pre-heat oven to 176°C/350°F. Next, heat up your milk and once it’s simmering, switch off the heat and add in your Thai tea mix and cover. I steeped mine for around 10 minutes.

In the mean time whisk together your flour, baking powder and salt, set aside.

Cream butter and sugar together until light and fluffy. Add eggs one at a time into butter and sugar mixture until fully combined, and whisk in vanilla.

Sieve your milk mixture if you’re using loose tea leaves. Mix all the ingredients together alternating between flour and milk into your butter mixture, add in 4 batches.

Scoop batter into cupcake moulds lined with cupcake liner filling it until 3/4 of the way full. Bake in oven for 20-30 minutes. Check it with a toothpick inserted in the middle and if it comes out clean, you’re done. Cake should be springy to the touch. Cool completely before frosting.

For the frosting, cream butter until smooth and pour in the condensed milk and mix till mixture is homogeneous. Add icing sugar and vanilla & whisk until smooth and creamy. Frost you cooled cupcake and decorate it with a mini straw!

IMG_2009

Fluffy cake w/ creamy frosting

INGREDIENTS for 24 cupcakes

recipe adapted from Bowen Appétit 

Cupcakes

2 cups whole milk

1/4 cup condensed milk

3/4 cup Thai iced tea mix (I used 10 tea bags)

2 3/4 cups cake flour (unsifted)

2 1/2 tsp. baking powder

3/4 tsp. salt

225grams butter, room temperature

1 3/4 cups sugar

4 eggs, room temperature

1 tbsp. vanilla

Frosting

225grams butter, room temperature

3/4 cups condensed milk

5/6 cups powdered sugar, sifted or whisked to remove lumps

2 tsp. vanilla

*I got my Thai tea mix from Thailand but I’m sure you can get them from your local asian supermarket or specialty stores.

OMG love this recipe! It taste just like a glass of Thai milk tea minus the ice. You can definitely taste the flavour of the tea in the cake and also condensed milk from the frosting. Planning on make a whole cake with this recipe for future birthday celebration. Thank you Bowen Appétit for sharing this recipe 😀 ❤